
4 Survival Skills for the North Woods
Do you have the basic skills to survive in the wild? At Roots, Sarah Corrigan and Brad Salon teach students the skills to stay alive in the wilds of New England. Though this isn’t a comprehensive list, these pointers could get you out of a sticky situation. For more about Roots, see “Getting Back to Our Roots,” from the September 2017 issue of Vermont Sports.
How to Make a Water Filter
While hand-made water filters will not cut biocontaminants like E. coli and giardia from your water supply, it will get rid of suspended materials like plant matter. In a best case scenario, your filter could take out abiotic 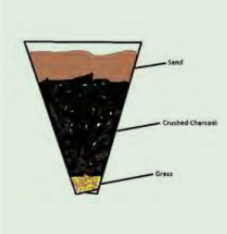 materials like mercury and cyanide, but (especially for first-time filter makers), don’t count on it.
Step 1. Find or make a cylindrical or cone-shaped container using white pine, basswood, elm or birch bark.
Step 2. Fill the container’s opening with large pebbles, topped with grass.
Step 3. Fill the container with layers of sand, charcoal, grass, more sand, topped with grass.
Step 4. Place a container below the filter’s opening. Pour water through the top of the filter. Be prepared to be patient: the water will slowly drip from the filter, and may take a few hours to fully collect.
How to Make a Bark Water Container
Hopefully, you’ll never find yourself in the woods without a container for water. But if your stove or heat-proof water container is the victim of a midnight bear robbery (not a totally unlikely scenario), you’ll need to improvise.
Step 1: Identify a small tree with soft, workable bark. Birch, pine and basswood work well.
Step 2: Find an easily-accessible area of the tree without knots or branches. 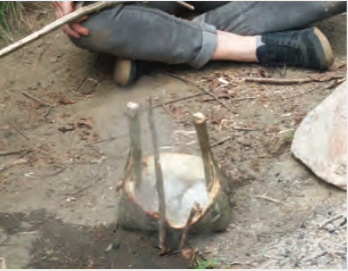 Using a sharp knife, carve a vertical line about five inches long into the trunk. Your knife should cut about a quarter-inch deep, through the first layer of bark. Along the top and bottom of the vertical cut, carve two lines around the circumference of the tree, keeping your knife a quarter-inch deep, so that the cuts create two horizontal flaps. When you’ve cut around the entire tree, peel the bark back from the vertical cut. If your cuts are deep enough, you should be able to remove the bark easily. You should have a rectangular piece of bark.
Step 3: On the outside of the bark, carve shallow lines diagonally from the corners. Fold the corners of the bark on these lines, pinching them together as if you’re wrapping a present. To hold the corners in place, cut small, sturdy pieces of branch and split them to the middle to make pins. Pin the corners to the side of the bark container.
Step 4: Fill your container with water. Make a fire, and place a few stones into it. When the stones are hot, carefully move them (using sticks) into the bark container, keeping a safe distance in case the hot water splashes. Allow the water to boil. Pro tip: Avoid rocks that have been sitting in water for a prolonged period of time–as the air bubbles in them may cause them to explode.
How to Kill Waterborne Pathogens
If you’re on a wilderness trip in New England, your two biggest potential dangers are hypothermia and unsafe water. Water from Vermont rivers, lakes and streams is not safe to drink without treatment. Biological contaminants from farm animals, sewers and boat toilets, to name a few, can give you a nasty bout of any of the diseases below. Whenever possible, find a spring (water that’s coming directly out of the ground), or water that’s clear and moving quickly. When in doubt, boil your water. Water’s boiling point is 212ºF, a temperature that will kill any of the common waterborne diseases in New England.
Parasites (like giardia and cryptosporidium): Die at 131ºF
Bacteria (like cholera, E.coli, salmonella, roto virus): Die at 140ºF
Hepatitis A: Dies at185ºF
Make a Fire With a Bow Drill
STEP 1. Collect your materials. The simplest bow drill kit consists of a bow, a spindle, a handhold, a board and a bundle of tinder. You’ll need a sharp carving knife to create some of these components.
The bow: Find or cut a live, sturdy but lightweight branch, about the width of your index finger and about as long as the space between your finger tips and elbow. Split both ends of the branch two inches down, and tie a cord into the splits using a square knot. The cord can be nylon, cotton, leather, rawhide, etc., and should be one and a half times the length of your bow. When you’ve connected the cord to the branch, the bow should bend slightly, and the cord should be taut.
The spindle: The spindle and the board should be made from the same type of dead, dry wood so that they burn at an even pace when you apply friction. Find a soft, non-resinous wood, like cedar or basswood. Take a thin piece of this wood and carve it into a straight dowel that measures about nine inches long and one inch in diameter. Carve the last inch of each end into sharp points.
The board: By the time you’ve used the board for several fires, it will loosely resemble the board game Mancala–a flat piece of wood with lines of marble-sized indents. Using the same type of wood you used for the spindle (dead and dry), find a branch that measures about three to fours inches in diameter, and split it evenly down the middle. Continue to split the branch until you have a flat board, about one inch thick and three inches wide. Carve the board’s face to remove any protrusions. When the face is relatively smooth, carve a small, round indent the size of your spindle’s point about a half-inch from the edge of the board.
The handhold: You’ll hold this atop the rotating spindle to keep it steady and protect your hand from burns. To make a handhold from a branch, cut it to the size of your palm and then split in half. Carve a small depression into the center of the flat side where the tip of the spindle will go. A smooth, palm-sized stone with a small depression on its underside works well as a handhold, too.
The tinder: The tinder bundle is the first “food” a fire will consume, and an effective bundle will help start your fire quickly. Gather a large handful of dry, fibrous material. The more surface area per mass, the better. You can use dead grass and leaves, dry pine needles, and dead inner bark from fibrous trees like poplar, cedar and oak. Dead plants like milkweed, dogbane and stinging nettle can create the same fibrous effect. Be sure to avoid dangerous materials, like poison ivy vines, which are harmful to breathe when burned. To construct the bundle, shred your tinder into strings. Buff the fibers by holding them lengthwise and moving your hands in a bicycle motion. Work the largest fibers into the shape of a bird’s nest, and place the small remaining dusty bits into the nest’s center.
STEP 2. Make the fire. The bow drill helps you create a friction fire that’s made when the downward-facing spindle point is ground into the wooden board. You’ll use your bow to spin the spindle, which creates friction. With the proper form, that friction will create an ember, which you’ll place in your tinder bundle to make a flame.
Proper positioning: Kneel on the ground with one leg straight back. Place your right foot on the board, just to the left of the indent where your spindle will go. Twist your spindle into the bow so that it’s looped on the outside of the bow’s cordage, then place the spindle, with the hand hold on top of it, into the board’s indent with your left hand. Bracing your left wrist against your upright shin, place your body weight on top of the spindle and handhold.
Create friction: Gripping the curved bow with your right hand, push the bow back and forth to grind the spindle into the board. Move your arm quickly and fluidly, avoiding jerky movements and pauses. When the board starts to smoke, pull the spindle away, and empty the smoky dust you’ve created onto a small, flat scrap of wood or stone. Don’t discard this dust–you’ll need it later.
Carve a notch: Using your carving knife, carve a triangular notch into the side of your board. The notch should look like an arrow pointing to the center of the hole you just drilled into the board. Be sure that the notch reaches the hole. You should have an entire triangular gap in the board when you’re finished.
Create an ember: Place the triangular notch in your board on top of the flat piece of wood or stone with your dust. Resume the bow drill position, and drill the spindle into the board at a fast pace. You should see dark solids oozing from the notch. When you see smoke, remove the spindle and carefully tap the loose matter–your ember–on top of the dust. Move the ember to your tinder bundle and close the tinder loosely around it. Blow on the ember until you see a flame.
To learn more of these skills, visit Roots. rootsvt.com
Featured Photo Caption: During Roots’ weekend classes, students camp in a riverfront meadow. On longer classes, you’ll be building your own shelters in the woods. Photo by Emma Cotton